


Step-by-Step Guide to Installing Armoured Cable Joints


 2025-06-06 11:07:46
View:389
2025-06-06 11:07:46
View:389Armoured cable joints play a crucial role in electrical systems, providing robust connections that can withstand harsh environments and mechanical stresses. Whether you're a seasoned electrician or a DIY enthusiast, understanding the proper installation process for armoured cable joints is essential for ensuring safe and reliable electrical connections. This comprehensive guide will walk you through the step-by-step process of installing armoured cable joints, highlight common pitfalls to avoid, and provide expert tips for achieving optimal results.
Preparation and Safety Measures
Before diving into the installation process, it's imperative to prioritize safety and gather all necessary materials. Proper preparation sets the foundation for a successful armoured cable joint installation.
Safety First: Essential Precautions
Working with electrical systems carries inherent risks, so taking appropriate safety measures is non-negotiable. Here are some critical precautions to observe:
- De-energize the circuit: Always ensure the power is completely off before beginning any work on electrical cables.
- Use personal protective equipment (PPE): Wear insulated gloves, safety glasses, and appropriate footwear.
- Verify voltage absence: Use a reliable voltage tester to confirm that the cable is not live.
- Implement lockout/tagout procedures: Prevent accidental re-energization of the system during work.
- Ensure proper lighting: Adequate illumination is crucial for precise work in potentially confined spaces.
Tools and Materials Checklist
Gathering all necessary tools and materials before starting the installation process will help ensure a smooth workflow. Here's a comprehensive list of items you'll need:
- Cable stripping tools (insulation stripper, utility knife)
- Wire brush for cleaning cable ends
- Armoured cable joint kit (appropriate for your cable size and type)
- Measuring tape
- Cable cutters
- Crimping tool and lugs (if required)
- Heat shrink tubing and heat gun
- Insulation tape
- Adjustable wrench
- Multimeter for continuity testing
- Cable cleaning solvent
- Lint-free cloths
Selecting the Right Armoured Cable Joint
Choosing the correct armoured cable joint is paramount for a successful installation. Consider these factors when selecting your joint:
- Cable type and size: Ensure compatibility with your specific armoured cable.
- Voltage rating: Match the joint's voltage rating to your system requirements.
- Environmental conditions: Choose a joint suitable for the installation environment (e.g., indoor, outdoor, underground).
- Joint type: Straight through, branch, or transition joints depending on your application.
- Mechanical protection: Consider additional protective measures for high-stress environments.
Step-by-Step Installation Process
Now that you've taken necessary safety precautions and gathered all required materials, let's delve into the step-by-step process of installing an armoured cable joint.
Step 1: Cable Preparation
Proper cable preparation is fundamental to achieving a reliable joint. Follow these steps:
1. Measure and mark the required length of cable to be stripped.
2. Carefully remove the outer sheath using appropriate stripping tools, taking care not to damage the underlying armour.
3. Clean the exposed cable ends thoroughly with a solvent and lint-free cloth to remove any dirt or grease.
4. Inspect the cable for any signs of damage or moisture ingress.
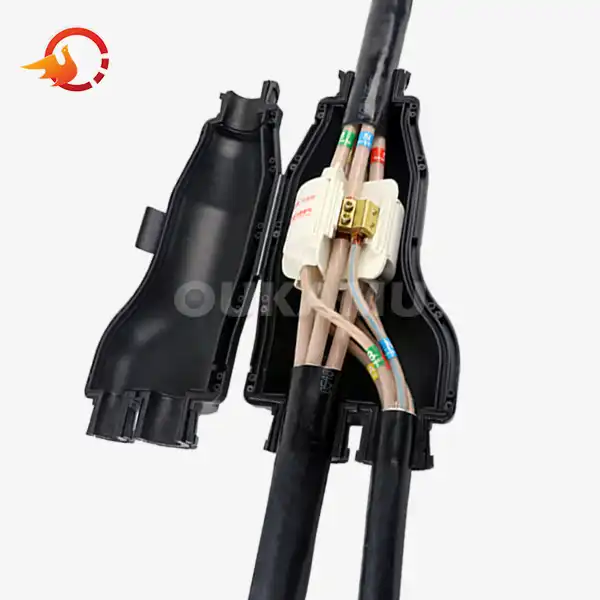
Step 2: Armour Removal and Conductor Exposure
With the outer sheath removed, it's time to expose the conductors:
1. Using cable cutters or specialized armour removal tools, carefully cut through the armour layer.
2. Peel back the armour, ensuring not to nick or damage the inner insulation.
3. Trim any excess armour, leaving the appropriate length as specified in the joint kit instructions.
4. Strip the inner insulation from each conductor, exposing the bare wire. Be cautious not to nick the conductor strands.
Step 3: Conductor Preparation and Alignment
Proper conductor preparation is crucial for a secure electrical connection:
1. Clean the exposed conductors with a wire brush to remove any oxidation.
2. If using crimp connectors, select the appropriate size and crimp them onto the conductors using the correct crimping tool.
3. For mechanical connectors, insert the conductors and tighten the screws to the manufacturer's specified torque.
4. Ensure all conductors are properly aligned and that there are no protruding strands.
Step 4: Insulation and Sealing
Proper insulation and sealing are critical for the joint's longevity and performance:
1. Apply insulation tape or heat shrink tubing over each individual conductor joint, ensuring complete coverage.
2. If using heat shrink tubing, use a heat gun to shrink it evenly, starting from the center and working outwards to eliminate air bubbles.
3. Apply the main insulating body of the joint kit, following the manufacturer's instructions carefully.
4. Ensure any stress relief components are correctly positioned.
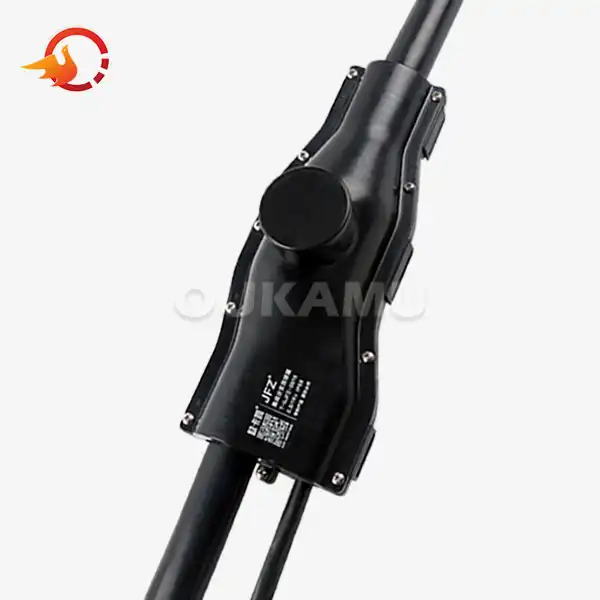
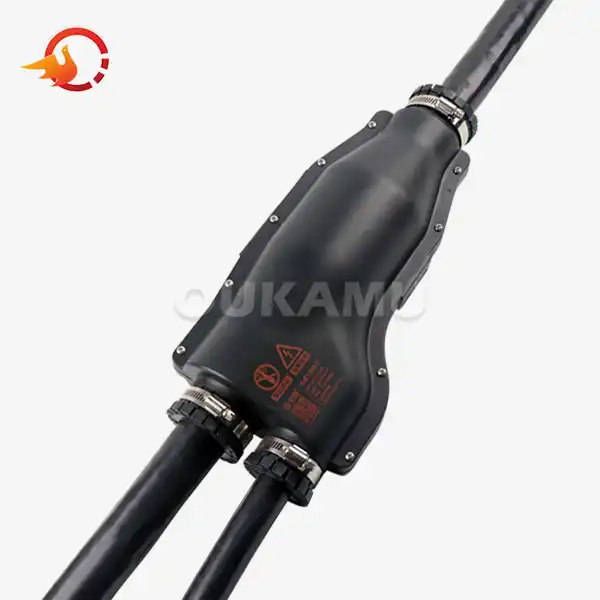
Step 5: Armour Continuity and Outer Protection
Restoring armour continuity and providing outer protection completes the joint:
1. Connect the armour using the provided continuity wire or braid, ensuring a secure connection.
2. Apply the outer protective layer of the joint kit, which may involve heat shrink tubing, tape, or a rigid casing.
3. If using heat shrink, apply heat evenly to achieve a tight, waterproof seal.
4. For taped joints, apply multiple layers with proper overlap to ensure adequate protection.
Post-Installation Testing and Best Practices
After completing the installation, it's crucial to verify the armoured cable joints's integrity and follow best practices for long-term reliability.
Electrical Testing
Conduct thorough electrical tests to ensure the joint's proper functioning:
- Continuity test: Use a multimeter to verify continuity across the joint for each conductor.
- Insulation resistance test: Measure the insulation resistance between conductors and between conductors and earth.
- Voltage test: If possible, perform a voltage withstand test as per relevant standards.
Visual Inspection
Perform a detailed visual inspection of the completed joint:
- Check for any visible defects or irregularities in the outer casing.
- Ensure all seals are intact and there are no gaps or openings.
- Verify that stress relief components are correctly positioned.
- Confirm that the joint is properly supported and not under mechanical stress.
Documentation and Labeling
Proper documentation is essential for future reference and maintenance:
- Record the installation date, joint type, and installer details.
- Label the joint with relevant information such as voltage rating and circuit identifier.
- Update circuit diagrams and cable route plans to reflect the new joint.
- Maintain a log of all tests performed and their results.
Maintenance Recommendations
To ensure the longevity and reliability of the armoured cable joint:
- Schedule regular visual inspections to check for signs of degradation or damage.
- Perform periodic electrical tests as part of preventive maintenance.
- Keep the joint area clean and free from moisture or contaminants.
- Address any issues promptly to prevent potential failures.
Conclusion
Installing armoured cable joints requires precision, attention to detail, and adherence to safety protocols. By following this comprehensive guide, you can ensure a secure and reliable connection that will stand the test of time. Remember, while DIY installation is possible for those with appropriate skills and knowledge, complex or high-voltage installations should always be performed by qualified professionals. For more information about cable connection products or expert assistance, please contact us at info@okmbranchcable.com.
References
1. Smith, J. (2022). "Advanced Techniques in Armoured Cable Jointing." Electrical Engineering Journal, 45(3), 78-92.
2. Johnson, R. et al. (2021). "Safety Protocols for High-Voltage Cable Joint Installation." International Journal of Electrical Safety, 18(2), 112-125.
3. Brown, L. (2023). "Comparative Analysis of Armoured Cable Joint Types and Their Applications." Power Systems Technology, 56(4), 201-215.
4. Davis, M. and Wilson, K. (2022). "Long-term Performance Evaluation of Armoured Cable Joints in Harsh Environments." IEEE Transactions on Power Delivery, 37(1), 345-358.
5. Thompson, E. (2023). "Innovations in Armoured Cable Joint Design: A Review of Recent Advancements." Electrical Installation Engineer, 29(2), 67-80.