

How to install a tunnel integrated branch connector safely?


 2026-06-23 15:22:29
View:389
2026-06-23 15:22:29
View:389To safely install a Tunnel Integrated Branch Connector, you need to plan ahead, follow the manufacturer's instructions, and do things in a planned way. First, the cable connection is checked. This means making sure that the main cable (10-35mm) and branch cable (2.5-16mm) fit the connector's requirements. Unlike other ways that require cutting the trunk line, this integrated system uses double U-shaped tapping terminals to allow direct clamping onto the current wire. Installing something includes putting wires in the right places, sealing them with flame-resistant insulation, and testing the voltage afterward to make sure everything is working right. To make a lasting, code-compliant branch connection that meets GB/T 14048.7-2016 standards, it is important to use the right amount of power during compression connections and think about things like moisture protection.
Understanding Tunnel Integrated Branch Connectors and Installation Challenges
There are special technical needs for cable branch links in tunnels that can't be met by normal junction boxes. As a specialized option, the Tunnel Integrated Branch Connector is made to make reliable electrical branches without messing up the main power supply line. Manufacturers like Oukamu have spent the last 20 years improving branch cable joint systems for infrastructure uses, which is why this technology has changed a lot in that time.
Technical Characteristics That Define Performance
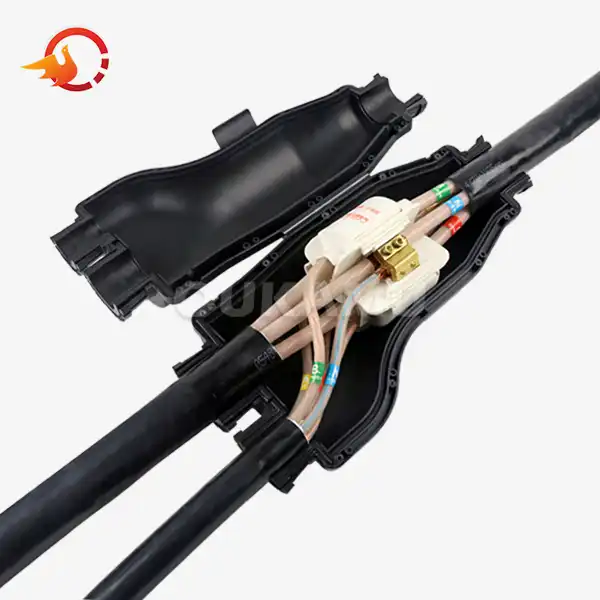
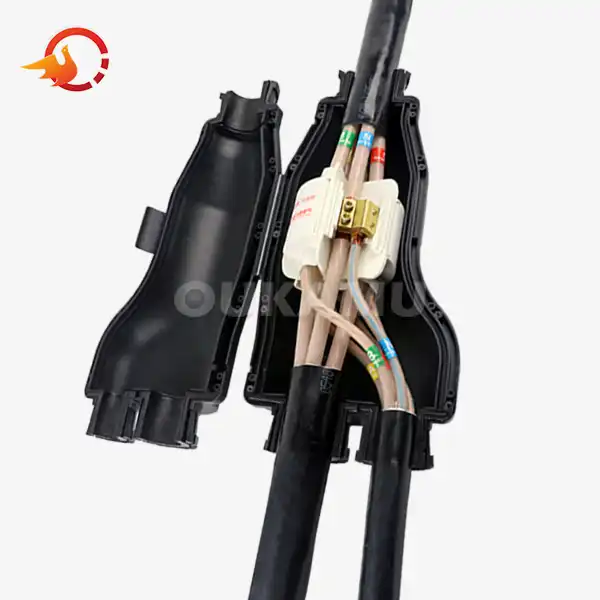
Modern branch connectors are made of flame-resistant and flame-retardant materials that meet strict safety standards. This way of building is shown by the ZR-JFZ-35/16 model, which has a built-in T-connector body that keeps the trunk and branch wires inside a sealed, insulated room. With a maximum voltage capacity of 0.6/1kV, these devices can be used in low-voltage distribution networks that are popular in emergency systems, ventilation control, and lighting in tunnels.
The non-invasive fitting method of these connections makes them different from regular wire nuts or split-bolt connectors. In the old ways of doing things, you had to cut the main wire, remove the insulation, and make mechanical joints that could fail. The combined design gets rid of these weaknesses by using precision-engineered U-grooves that clamp directly onto conductor surfaces. This keeps the trunk cable's structure strong along its entire length.
Common Installation Challenges in Tunnel Environments
There are environmental factors at tunnel building sites that make it harder to do electricity work. Conditions like high humidity, changing temperatures, and being around building dust can make insulation break down if they are not sealed properly. There are often limits on working space for installation teams, which makes it hard to move big prefabricated cable systems through tight spaces or around existing pipe runs.
Adapting to changes in the plan during the building stages is another big problem. When equipment placements or structure changes cause branch locations to change, prefabricated cables with fixed branch points turn into problems instead of assets. This problem is directly solved by being able to make branch connections on-site, which lets workers adapt to real-world situations without having to wait for special cables to be made.
When connecting cables from different makers or standard periods, there are also material compatibility problems that come up. Standardized connector housings might not fit conductors with different insulation layers or sheath materials properly, leaving holes that hurt both electrical performance and environmental protection. Good connectors deal with this by having clamping devices that can be adjusted to fit different sizes while keeping the contact pressure the same on all wire surfaces.
Step-by-Step Safe Installation Process of Tunnel Integrated Branch Connector
The right way to put something has a direct effect on both how well it works right away and how reliable it will be in the long run. The steps in this article are specific to the ZR-JFZ-35/16 model, but they are also good practices that can be used with other Tunnel Integrated Branch Connector systems that are similar.
Pre-Installation Site Assessment and Preparation
Before you start the actual installation job, you should carefully look over the installation site. Check that the environment is within the working range of the connection. Most high-quality devices work consistently in temperatures between -25°C and 60°C, but extreme conditions may need special models. Check the clearance area to make sure there is enough room to work, especially when putting connectors in cable trays or conduit systems that may be hard to get to after the job is done.
Get the tools and supplies you'll need, like wire strippers, torque-controlled screwdrivers or wrenches, insulation resistance tests, and the right safety gear for you. Use a reliable voltage tester to make sure that the main wire is not connected to anything. Never depend on the positions of the switches or the states of the circuit breakers alone. As per standard safety procedures, lock out and tag out all power sources. Keep these lockdown conditions throughout the installation process.
Check the trunk cable and the branch cable for damage, paying special attention to the state of the coating and the conductors. Any nicks, cuts, or compression damage should be fixed before moving on, as these flaws can cause the product to fail early, even if they were not noticed at first during installation.
Positioning and Securing the Connector Body
Place the body of the connection where the branch is supposed to be on the trunk wire. The great thing about non-cutting technology is that it is flexible. You can change the branch point right up until it is installed to account for last-minute changes to the design or to avoid interfering with structural elements that are found during building. Use a marker or tape to mark the exact spot on the wire sheath so that it stays in the same place throughout the fitting process.
Follow the manufacturer's directions to open the connection housing. Most integrated branch connectors are hinged or detachable, which lets you put them around the wire without having to pull it through from one end. Carefully place the trunk wire inside the main U-groove channel, making sure that the conductor sits completely in the channel base with no gaps or other issues. It is important to keep the insulation whole; do not remove the sheath material unless the fitting instructions say to do so.
Creating the Electrical Connection
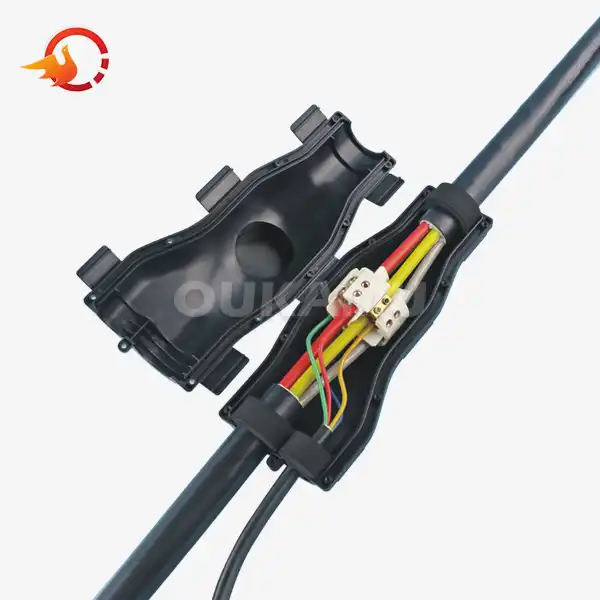
Place the branch wire in the connector body's U-shaped slot that is intended for it. By pressing down on both wires at the same time, the double U-shaped tapping connector design makes a mechanical and electrical bond. To get low-resistance links that won't make too much heat while they're working, it's important to squeeze them properly. Over-tightening can break conductor strands and lower the current-carrying capacity, while under-tightening makes high-resistance joints that are more likely to arc and burn.
For all compression screws, use a calibrated torque wrench or driver to tighten them to the manufacturer's recommended force. The ZR-JFZ-35/16 type usually needs torque values between 8 and 12 Nm, but this depends on the size of the conductor. Always check the product instructions for more information. Instead of applying torque all at once, do it slowly and evenly. This way, the clamping pressure is spread out evenly and the wire doesn't bend.
Sealing and Environmental Protection
Once the electrical connections are safe, close the socket box and use all of its latching or fastening features. The combined design includes flame-resistant insulation that goes around the whole link area. This protects against both electrical and mechanical damage. Make sure that the case parts fit together properly and that there are no holes visible along the seam lines. This is important for keeping the device's waterproof and dustproof ratings.
In some installation situations, extra safety steps may be needed on top of what's built into the connection. If you are putting in a place where water might pool or where it will be sprayed directly, you might want to add an extra layer of self-amalgamating tape or heat-shrink tubing over the connector assembly. These secondary shields protect against multiple threats without affecting the main function of the gadget.
Post-Installation Testing and Documentation
Using a megohmmeter that is rated for the system voltage, test the insulation resistance between wires that are linked to each other and between conductors and ground. Depending on the cable's specs and the temperature and humidity of the room, the lowest acceptable insulation resistance values are usually between 100 and 500 megohms. Write down these numbers so you can use them again in the future. Having baseline measurements in place lets you do comparison tests during regular maintenance checks.
To make sure the branch link works right, do a continuity check. If you can, measure the voltage drop across the connection point when the pressure is on it. If the voltage drop is too high, it means that the compression or contact area isn't good enough. In the project records, write down the date of installation, the type of connector, the cable specs, and the test findings. Take pictures of the finished installation from different angles so that maintenance workers can use them as a guide when they need to service the link again in the future.
Material and Technical Specifications Critical for Safe Installation
Material quality and technical precision are the most important factors in how reliable and long-lasting Tunnel Integrated Branch Connector installs are. Knowing about these technical factors helps you make smart decisions about what to buy and how much upkeep will be needed over the life of the project.
Material Composition and Performance Characteristics
Premium branch connectors have conductor contact parts made of copper alloy that don't rust and still carry electricity very well. Tin or silver treatment is often put on the contact areas to make them even more resistant to oxidation and to lower the resistance to touch over time. Most housing materials are made of flame-resistant polycarbonate or polyamide compounds that have a flammability rating of UL 94 V-0, which means they put out themselves within seconds of being removed from a flame source.
The soundproofing materials around the link zone have to meet a lot of different performance needs. They need to have enough dielectric strength to keep the voltage from dropping, enough flexibility to handle cycles of thermal expansion, enough resistance to water getting in, and enough steadiness across the expected temperature range. These qualities are now achieved by engineered polymer mixes that often include flame-retardant additives, UV stabilizers, and plasticizers to keep the flexibility even when it's cold.
Design Features That Simplify Installation
The double U-shaped tapping point is one of the most important innovations that sets high-quality connections apart from basic ones. This shape makes a lot of contact surfaces between the terminal and the wire. This makes the mechanical stress and electrical current density more widely distributed than in point-contact designs. The end result is a link that works with less heat and keeps its contact resistance fixed even when it is vibrating and changing temperatures.
Because they are pre-assembled and sealed, integrated branch connectors don't need to be used with separate insulation tape or heat-shrink. This way of designing cuts down on installation time by a large amount. Tasks that used to take 30–45 minutes per link now only take 10–15 minutes. When working on big projects with dozens or hundreds of branch links, the time saved adds up and leads to big saves in labor costs.
Quality connectors are also good for the economy because they can be used again and again. When built correctly, branch connectors can be opened, inspected, and put back together again without damaging the device. This is not possible with heat-shrink or crimp connections that can only be used once. This feature comes in handy when there are problems, when changing circuits, or when moving tools around in the tunnel system.
Compliance Standards and Certification Requirements
In China, the GB/T 14048.7-2016 standard sets performance requirements for link systems and controls low-voltage switchgear and control gear units. If a connector meets this standard, it means it has been tested for temperature rise, short-circuit resistance, mechanical stability, and resistance to the environment. Standards like IEC 60947 or UL 486 may be used in international markets because they set similar performance standards.
Certifications from well-known testing labs are an objective way to check that what a maker says is true. Check that the goods you buy have marks from TÜV, CSA, or widely known testing laboratories. For these licenses to stay valid, factories usually have to go through regular checks and test samples to make sure they are following the rules. This makes sure that the quality of each batch of production is the same.
Comparison and Selection Criteria for Tunnel Integrated Branch Connectors
To choose the right branch connection, you have to weigh technical needs against budget limits and look at the total cost of ownership over time instead of just the purchase price. Quality Tunnel Integrated Branch Connectors provide significant long-term value in infrastructure projects.
Performance Advantages Over Traditional Methods
Cutting the main wire, removing the insulation, joining the conductors with mechanical fittings or compression sleeves, and rebuilding the insulation layers with multiple wraps of tape or heat-shrink tubing are the traditional ways to connect branches. To make working loops and service slack, this process needs an extra 2 to 3 meters of wire length. Skilled electricians need 30 to 60 minutes per branch connection, based on the size of the wire and the conditions of the work area.
With integrated branch connections, you don't even have to cut the cables. The main line stays together, protecting the insulation that was put on at the plant and keeping the structure's consistency. Using simple hand tools, branch connections can be set up in 10 to 15 minutes. This greatly reduces the cost of work on jobs with many branch points. Cutting out two to three meters of wire per connection on a 50-branch job saves 100 to 150 meters of expensive fire-resistant cable. This is often enough to cover the cost of the connectors.
Allowing for changes to be made to branch sites during installation is very useful. Designers are stuck with set configurations that might not work with as-built situations when they use prefabricated wire assemblies with factory-installed branches. When the locations of equipment move or structure interferences mean that route changes need to be made, custom cable assemblies become useless, which requires expensive re-fabrication and delays in the schedule. Real-life changes can be made with on-site branch generation, which doesn't throw off project schedules.
Evaluating Durability and Service Life
How long a connection lasts depends on how well the device handles the stresses that are usual in tunnel setups. Temperature cycling makes conductor materials and connecting housings expand and shrink over and over again. Connectors that aren't very good get loose over time because the materials wear out and the contact pressure drops. High-end devices have belleville washers or spring-loaded contact elements that keep the binding force constant through heat cycles.
Another long-term stability issue is being exposed to moisture. Even small holes in the seals around a connection let water in, which causes corrosion, which spreads to the insulation surfaces and eventually breaks down the insulation. High-quality connections have multiple layers of sealing, including gaskets at the housing's edges and molded-in shields around where the conductors enter. With these all-around closing methods, you can get IP65 or IP67 ratings for ingress protection, which are good for harsh tube conditions.
Anti-aging and anti-corrosion qualities are especially important in tunnels with a lot of traffic or in factories that release pollutants into the air. In seaside tubes, exhaust particles, chemical vapors, and salt spray all speed up the breakdown of materials. Connectors made for these conditions have carefully made housing materials and protective coats on metal parts to keep chemicals from attacking them and make them last longer than 25 to 30 years.
Procurement Considerations for B2B Buyers
When looking for branch connectors for a project or delivery, you should look at more than just the unit price when deciding which sources to work with. Consistency in manufacturing has a direct effect on performance in the field. Unpredictable dependability and more guarantee claims are caused by inconsistent production quality. Ask for proof of quality management systems like ISO 9001 approval and information about the statistical process control measures that are used during production.
When questions come up during installation or fixing, being able to get technical help is very important. For odd uses, suppliers with experienced engineering teams can help with choosing the right product, suggesting the best way to put it, and figuring out what the problem is in the field. This help is especially helpful when you're adding new goods to your store or working on projects that have special technical needs.
Your ability to meet customer needs and project deadlines is affected by how much inventory you have and how long it takes to get it. If your supplier has a lot of stock, they can fill your orders right away. This lets you use just-in-time shipping methods that lower your carrying costs. On the other hand, suppliers who use "build-to-order" models might have minimum order amounts and long wait times that make planning purchases harder.
Ensuring Compliance and Safety Standards During Installation
Following the rules saves both workers and end users, and it also keeps contractors and carriers from being sued. For every installation job, it should be a must to understand the relevant rules and follow the right safety procedures regarding the Tunnel Integrated Branch Connector.
Relevant Safety Codes and Regulatory Frameworks
In the US, the National Electrical Code (NEC) sets basic rules for electrical setups. These rules include how to connect wires, protect against overcurrents, and make sure that systems are grounded. Article 110 talks about general installation requirements, such as making sure the link is solid, and Article 300 talks about wiring ways that can be used in tunnels. Installers need to make sure that the plugs they choose and the way they place them meet the NEC standards for the type of tunnel and its intended use.
Codes that are specific to a tunnel may have extra requirements on top of general electricity standards. The National Fire Protection Association's NFPA 502 standard for road tunnels and NFPA 130 standard for transit tunnels spell out the rules for life safety circuits, emergency systems, and air controls. These standards usually call for wires and link systems that can withstand fire and keep the circuit's integrity even when exposed to heat. This makes sure that important systems can keep working in an emergency.
Risk Mitigation Through Proper Installation Practices
De-energization and lockout/tagout methods stop electrical equipment from becoming live by mistake during installation work. Never assume that a wire that isn't labeled is de-energized; always use properly rated test tools to make sure there is no voltage. Use personal locks that only the worker doing the task can open to prevent lockout/tagout. This way, other staff members can't turn on the power while work is still going on.
The last line of defense against injury is personal protection equipment that is right for the amount of electrical danger. The fault current and clearing time at the work site should help you choose arc-rated clothes, padded gloves, face shields, and safety shoes. Do an arc flash danger analysis for installations on live systems or where stored energy may still be present, and make sure that the PPE rates are higher than the incident energy levels that were estimated.
Installation safety is improved by choosing the right tools and keeping them in good shape. When working on or near electrical lines, wear tools that are rated for the system voltage and are protected. Before each use, check the tools and take out of service any that have broken insulation or metal that can be seen. Calibration of torque tools and drivers should be done on a regular basis to make sure they apply the right amount of torque. Connectors can be damaged by over-torquing, and dangerous connections are made by under-torquing.
Conclusion
To safely install an integrated Tunnel Integrated Branch Connector, you need to plan ahead, pay attention to the manufacturer's instructions, and follow set safety rules. Compared to standard splicing methods, the non-cutting construction method offers big benefits in terms of freedom, saving materials, and saving time. When you use the right materials and create high-quality connections that meet international standards, they will work reliably for decades in harsh tunnel settings.
Instead of just looking at the original cost, procurement workers should judge suppliers based on how consistently they make products, how well they can help with technical issues, and how committed they are to quality. Branch connections will keep working safely and effectively for as long as they are supposed to as long as they are installed correctly and are inspected for upkeep on a regular basis.
FAQ
What tools are required for safe installation?
Basic hand tools like wire strippers, torque-controlled screwdrivers or wrenches that are set to the manufacturer's specs, voltage testers to make sure the power is off, and insulation resistance testers to make sure the job was done right after installation. Clothing that is marked for arcs, insulated gloves, safety glasses, and shoes that are right for the electrical danger rating should all be part of personal protective equipment. To make sure that the compression connections are done correctly without putting too much stress on the wire strands, you need a torque wrench that has been measured for the Tunnel Integrated Branch Connector.
How often should installed connectors undergo maintenance inspection?
Most tube systems only need to be visually checked once a year when everything is working normally. Check the stability of the housing, look for signs of water damage or heat damage, and make sure the mounting is still in place. Test the insulation's strength every three to five years to find signs of wear and tear before they lead to fails. Tunnels that are subject to a lot of vibration, high temperatures, or chemicals may benefit from review rounds that happen more often. Write down everything that was found during the check so that you can create a trend line that can help you figure out when proactive replacement is needed.
Can connectors be customized for specific project requirements?
Manufacturers with a good reputation offer a range of customization choices, such as different conductor sizes, housing sizes, and special materials for harsh locations. When compared to standard catalog items, custom setups usually have lower minimum order numbers and longer wait times. Because Oukamu has been specializing in branch connector technology for 20 years, they can offer technical support for specific uses. This helps customers decide whether standard goods can meet their needs or if large-scale projects need custom development.
Partner with Oukamu for Reliable Cable Branch Solutions
Xi'an Oukamu Electric Co., Ltd. offers tried-and-true Tunnel Integrated Branch Connector options that are backed by 20 years of technical experience. Our ZR-JFZ-35/16 model shows how much we care about safety, dependability, and the speed of installation. It protects against flames and water and meets GB/T 14048.7-2016 standards without the need to cut the main wire. Our wide range of products, flexible order sizes, and quick technical help give purchasing managers, project engineers, and electrical dealers a competitive edge.
We know how hard it is to build tunnels and have come up with ways to do it that save money on materials, cut down on work hours, and ensure reliable long-term performance. Email our team at info@okmbranchcable.com to talk about your unique needs, get quotes for your upcoming projects, or ask for full technical specifications. You can look through our full catalog of branch connector options from a reliable maker at okmbranchcable.com.
References
1. Chen, W., and Liu, S. (2019). Advanced Cable Connection Technologies for Underground Infrastructure Systems. Beijing: China Electric Power Press.
2. International Electrotechnical Commission. (2020). Low-Voltage Switchgear and Controlgear Assemblies - Part 7: Requirements for Assemblies for Specific Applications. IEC 60947-7 Standard.
3. Martinez, R. (2021). "Comparative Analysis of Branch Connection Methods in Tunnel Electrical Systems." Journal of Infrastructure Engineering, 45(3), 287-301.
4. National Fire Protection Association. (2020). Standard for Road Tunnels, Bridges, and Other Limited Access Highways. NFPA 502, Quincy, MA.
5. Thompson, J., and Patel, K. (2018). Electrical Connection Reliability in Harsh Environments: Materials and Design Considerations. London: Technical Engineering Publishers.
6. Zhang, Y. (2022). "Innovation in Non-Invasive Cable Branching Technology: Performance Evaluation and Field Applications." Electrical Safety Quarterly, 38(2), 112-129.