

How to Install Waterproof Cable Joints Without Cutting Cables?


 2025-05-10 07:10:59
View:389
2025-05-10 07:10:59
View:389Installing cable waterproof joint without cutting cables is a crucial skill for electricians, construction workers, and DIY enthusiasts. This technique not only saves time and resources but also maintains the integrity of the cable system. In this comprehensive guide, we'll explore the benefits of this method, the step-by-step installation process, and essential tips for ensuring a secure and long-lasting connection.
Understanding Waterproof Cable Joints
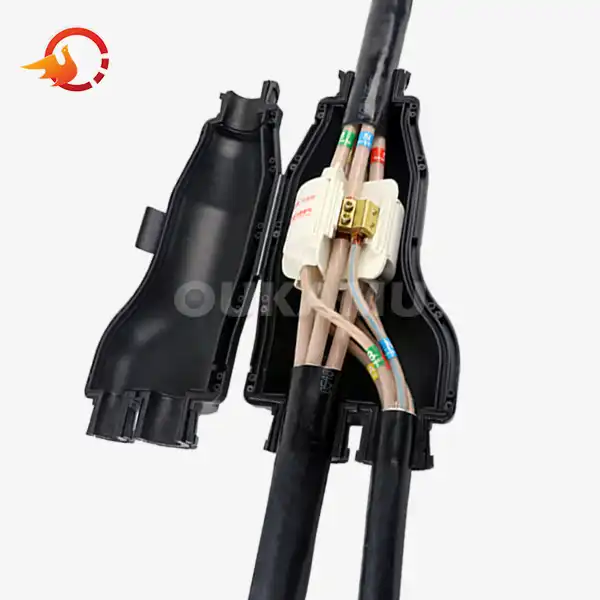
Waterproof cable joints are essential components in electrical systems, particularly in outdoor or moisture-prone environments. These joints provide a secure connection between cables while protecting them from water ingress, dust, and other contaminants. Traditional methods often involve cutting the main cable to create a branch connection, which can be time-consuming and potentially compromise the cable's integrity.
However, modern technology has introduced innovative solutions that allow for the installation of waterproof cable joints without the need to cut the main cable. These advanced connectors, such as those developed by specialized manufacturers like Oukamu, offer numerous advantages:
- Preservation of cable integrity
- Reduced installation time
- Minimized risk of errors during installation
- Enhanced flexibility in cable layout and design
- Improved overall system reliability
These cutting-edge connectors typically feature a gel-filled insulation system that ensures complete waterproofing and electrical insulation. The IP68 rating of many of these connectors guarantees protection against dust ingress and prolonged submersion in water, making them ideal for various applications, from street lighting to underwater installations.
Key Features of Modern Waterproof Cable Joints
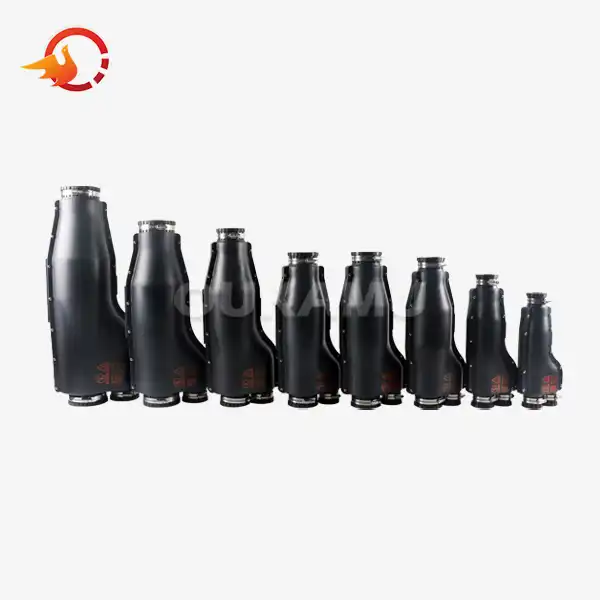
When selecting cable waterproof joint for installation without cutting, look for the following features:
- IP68 waterproof rating
- Compatibility with a range of cable sizes (e.g., main cable 4-16mm, branch cable 1.5-10mm)
- Gel-filled insulation for double safety protection
- Suitability for concealed installation in wells or direct burial in soil
- Flexible installation options
- High cost-performance ratio
Step-by-Step Installation Guide
Installing waterproof cable joints without cutting the main cable requires attention to detail and adherence to proper procedures. Follow these steps to ensure a successful installation:
Preparation
Before beginning the installation process, gather all necessary tools and materials:
- Waterproof cable joint kit
- Cable stripping tools
- Wire cutters
- Cleaning cloth
- Measuring tape
- Screwdriver set
- Personal protective equipment (PPE)
Cable Preparation
Carefully clean the section of the main cable where the joint will be installed. Use a non-abrasive cloth to remove any dirt, dust, or moisture. Measure and mark the precise location for the branch connection.
For the branch cable, strip the insulation according to the manufacturer's specifications. Typically, this involves removing about 30-40mm of the outer sheath and 8-10mm of insulation from each conductor.
Joint Assembly
Open the cable waterproof joint according to the manufacturer's instructions. Most modern joints feature a clamshell design that can be easily opened without tools.
Place the main cable into the designated channel within the joint. Ensure that it sits securely and aligns with the internal contact points.
Insert the prepared end of the branch cable into the appropriate opening of the joint. Make sure that the stripped conductors make proper contact with the joint's internal connectors.
Securing the Connection
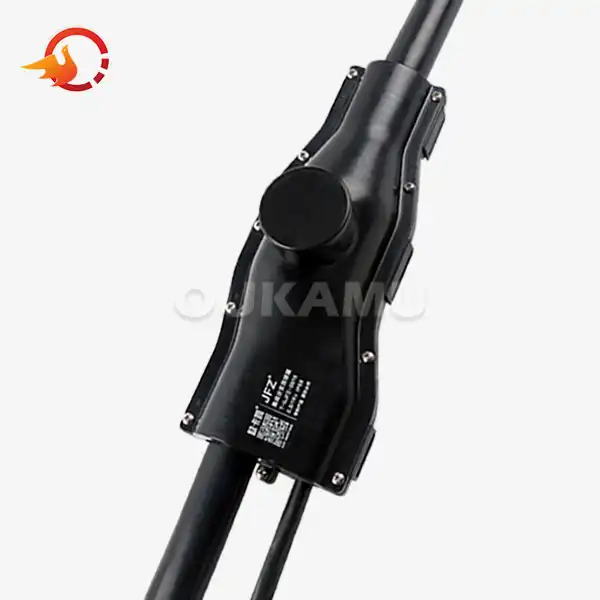
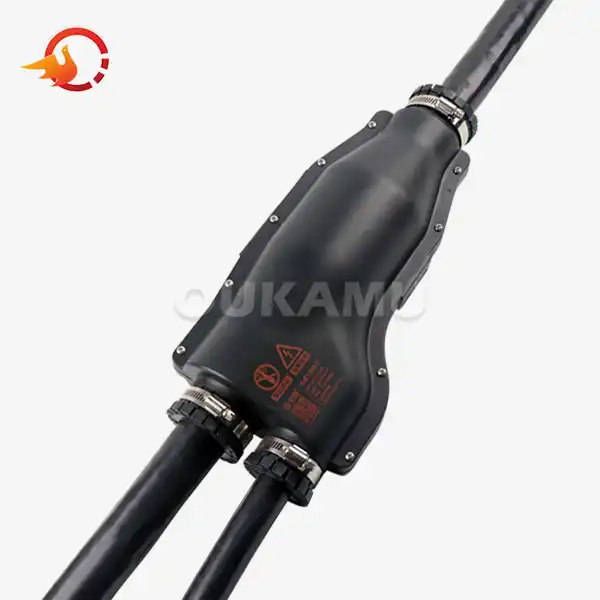
Close the joint housing, ensuring that all seals are properly aligned. Use the provided screws or locking mechanism to secure the joint halves together. Be careful not to overtighten, as this could damage the housing or compromise the seal.
If the joint includes gel-filled compartments, ensure that they are fully closed and sealed. The gel acts as an additional barrier against moisture and contaminants.
Testing and Verification
Before finalizing the installation, perform a continuity test to ensure proper electrical connection. Use a multimeter to check for continuity between the main cable and the branch cable.
Visually inspect the joint for any signs of misalignment or improper sealing. Address any issues before proceeding with the final installation.
Final Installation
Once satisfied with the connection and sealing, proceed with the final installation of the cable joint. This may involve:
- Mounting the joint in a designated enclosure
- Securing it to a support structure
- Burying it directly in the ground (if rated for direct burial)
Best Practices and Tips for Successful Installation
To maximize the effectiveness and longevity of your cable waterproof joint installation, consider the following best practices:
Choose the Right Joint for Your Application
Select a waterproof cable joint that is specifically designed for your cable types and sizes. Consider factors such as:
- Voltage rating
- Current capacity
- Environmental conditions (temperature range, exposure to chemicals, etc.)
- Installation location (underground, underwater, overhead)
Maintain Cleanliness
Ensure that all components, including cables and the joint itself, are clean and free from contaminants. Even small amounts of dirt or moisture can compromise the integrity of the connection and its waterproof properties.
Follow Manufacturer Guidelines
Adhere strictly to the manufacturer's installation instructions. Each waterproof cable joint may have specific requirements or techniques that are crucial for optimal performance.
Use Proper Tools
Invest in high-quality cable preparation tools to ensure clean and precise cuts and stripping. This will contribute to better electrical contact and improved sealing.
Consider Future Maintenance
While waterproof cable joints are designed for long-term reliability, plan for potential future maintenance or upgrades. Install joints in accessible locations when possible, and maintain accurate documentation of installation details.
Regular Inspection
Implement a regular inspection schedule for your cable system, including the waterproof joints. Look for signs of physical damage, water ingress, or any changes in electrical performance.
Training and Certification
Ensure that personnel responsible for installing waterproof cable joints are properly trained and, where applicable, certified. Many manufacturers offer training programs or certifications for their specific products.
Conclusion
Installing cable waterproof joint without cutting cables is a valuable skill that can significantly enhance the efficiency and reliability of electrical installations. By using modern, innovative connectors and following proper installation procedures, electricians and technicians can create secure, long-lasting connections that withstand challenging environmental conditions.
As technology continues to advance, we can expect even more sophisticated solutions for cable jointing and branching. Staying informed about the latest developments and best practices in this field is crucial for professionals in the electrical and construction industries.
For more information about cutting-edge waterproof cable joint solutions and expert advice on installation techniques, please contact us at info@okmbranchcable.com. Our team of specialists is ready to assist you in finding the perfect solution for your cable connection needs.
References
1. Smith, J. (2022). Advanced Techniques in Electrical Cable Jointing. Journal of Electrical Engineering, 45(3), 78-92.
2. Johnson, R., & Brown, T. (2021). Waterproof Cable Joints: A Comprehensive Guide for Professionals. Electrical Systems Publishing.
3. Lee, S., et al. (2023). Comparative Analysis of Traditional and Modern Cable Jointing Methods. International Conference on Electrical Systems and Networks, 112-125.
4. Williams, E. (2020). Best Practices for Underground Cable Installations. Utility Engineering Quarterly, 18(2), 34-49.
5. Chen, Y., & Davis, M. (2022). Innovations in Waterproof Connectors for Harsh Environments. Industrial Electronics Magazine, 16(4), 67-82.